このシリーズでは、ドキュメントサイトをつくりながら Docusaurus の使い方を説明しています。
前回「導入編」では、Docusaurus をインストールして動作確認するところまで進めました。今回は Docusaurus の基本設定を説明していきます。
はじめに
見出し「はじめに」このシリーズでは、架空の企業「Pace Layering(ペースレイヤリング)社」のコーポレートサイトに導入された、CMS の使用方法を記載したドキュメントサイトを題材とします。

画像ファイルの差し替え
見出し「画像ファイルの差し替え」本記事の完成後のデータ一式は以下の GitHub リポジトリにアップしています。
https://github.com/griponminds/docusaurus-tutorial/tree/vol-2
差し替え用の画像ファイルは static/img にアップしていますので、GitHub リポジトリよりダウンロードして使用してください。
なお、static 以下に格納したファイルは、ビルド時に build 以下にそのままコピーされます。その際に、画像ファイルの最適化の処理は行われませんので、個別に調整するか必要に応じてプラグイン1を導入します。
docusaurus.config.js の設定
見出し「docusaurus.config.js の設定」docusaurus.config.js は、サイトの構成を設定するためのファイルです。
このファイルは、前回の「導入編」でも少し触れましたが、以下のように config で設定したオブジェクトを module.exports でエクスポートしています。
// ...
const config = {
  title: 'CMS 操作ガイド',
  tagline: 'ウェブサイト運用担当者向けのガイドライン,
  // ...
  themeConfig:
    ({
      // Replace with your project's social card
      image: 'img/docusaurus-social-card.jpg',
      navbar: {
        title: 'CMS 操作ガイド',
        // ...
      },
    }),
};

module.exports = config;
それでは関連する項目を順番に設定していきます。項目数が多いので少し長くなりますが、直感的に理解できるものがほとんどです。
docusaurus.config.js の全コード(変更前)
// @ts-check
// Note: type annotations allow type checking and IDEs autocompletion

const lightCodeTheme = require('prism-react-renderer/themes/github');
const darkCodeTheme = require('prism-react-renderer/themes/dracula');

/** @type {import('@docusaurus/types').Config} */
const config = {
  title: 'CMS 操作ガイド',
  tagline: 'ウェブサイト運用担当者向けのガイドライン',
  favicon: 'img/favicon.ico',

  // Set the production url of your site here
  url: 'https://your-docusaurus-test-site.com',
  // Set the /<baseUrl>/ pathname under which your site is served
  // For GitHub pages deployment, it is often '/<projectName>/'
  baseUrl: '/',

  // GitHub pages deployment config.
  // If you aren't using GitHub pages, you don't need these.
  organizationName: 'facebook', // Usually your GitHub org/user name.
  projectName: 'docusaurus', // Usually your repo name.

  onBrokenLinks: 'throw',
  onBrokenMarkdownLinks: 'warn',

  // Even if you don't use internalization, you can use this field to set useful
  // metadata like html lang. For example, if your site is Chinese, you may want
  // to replace "en" with "zh-Hans".
  i18n: {
    defaultLocale: 'en',
    locales: ['en'],
  },

  presets: [
    [
      'classic',
      /** @type {import('@docusaurus/preset-classic').Options} */
      ({
        docs: {
          sidebarPath: require.resolve('./sidebars.js'),
          // Please change this to your repo.
          // Remove this to remove the "edit this page" links.
          editUrl:
            'https://github.com/facebook/docusaurus/tree/main/packages/create-docusaurus/templates/shared/',
        },
        blog: {
          showReadingTime: true,
          // Please change this to your repo.
          // Remove this to remove the "edit this page" links.
          editUrl:
            'https://github.com/facebook/docusaurus/tree/main/packages/create-docusaurus/templates/shared/',
        },
        theme: {
          customCss: require.resolve('./src/css/custom.css'),
        },
      }),
    ],
  ],

  themeConfig:
    /** @type {import('@docusaurus/preset-classic').ThemeConfig} */
    ({
      // Replace with your project's social card
      image: 'img/docusaurus-social-card.jpg',
      navbar: {
        title: 'CMS 操作ガイド',
        logo: {
          alt: 'My Site Logo',
          src: 'img/logo.svg',
        },
        items: [
          {
            type: 'docSidebar',
            sidebarId: 'tutorialSidebar',
            position: 'left',
            label: 'Tutorial',
          },
          {to: '/blog', label: 'Blog', position: 'left'},
          {
            href: 'https://github.com/facebook/docusaurus',
            label: 'GitHub',
            position: 'right',
          },
        ],
      },
      footer: {
        style: 'dark',
        links: [
          {
            title: 'Docs',
            items: [
              {
                label: 'Tutorial',
                to: '/docs/intro',
              },
            ],
          },
          {
            title: 'Community',
            items: [
              {
                label: 'Stack Overflow',
                href: 'https://stackoverflow.com/questions/tagged/docusaurus',
              },
              {
                label: 'Discord',
                href: 'https://discordapp.com/invite/docusaurus',
              },
              {
                label: 'Twitter',
                href: 'https://twitter.com/docusaurus',
              },
            ],
          },
          {
            title: 'More',
            items: [
              {
                label: 'Blog',
                to: '/blog',
              },
              {
                label: 'GitHub',
                href: 'https://github.com/facebook/docusaurus',
              },
            ],
          },
        ],
        copyright: `Copyright © ${new Date().getFullYear()} My Project, Inc. Built with Docusaurus.`,
      },
      prism: {
        theme: lightCodeTheme,
        darkTheme: darkCodeTheme,
      },
    }),
};

module.exports = config;
各項目の詳しい説明については、公式ドキュメントをご確認ください。
title
見出し「title」サイトのタイトルを指定します。前回の変更が残っている場合には、そのままで構いません。
module.exports = {
  title: 'CMS 操作ガイド',
};
url
見出し「url」サイトの URL(ホスト名)を指定します。この値は、rel="canonical" や OGP などのシェア関連の URL の指定にも使用されます。
今回は架空のサイトなので、仮の URL として IANA の管理下にある https://example.com を使用します2。
このあと指定する baseUrl に関連しますが、末尾の /(スラッシュ)は不要です。
module.exports = {
  url: 'https://example.com',
};
baseUrl
見出し「baseUrl」url で指定したルート直下に格納される場合には /(スラッシュ)を指定します。もし、サイトがサブディレクトリ以下に置かれる場合には、baseUrl: '/dir/' のように指定します。
こちらの値を変更すると、url と同様に、rel="canonical" や OGP の指定に反映されますが、加えて以下の項目にも反映されます。
- リンク指定(
<a href="...">) - 各ファイルパス(
<img src="...">など) - ローカルサーバを立ち上げたときの URL(
npm startコマンドの実行時など)
今回はルートディレクトリに格納する前提なので、/(スラッシュ)のままとします。
module.exports = {
  baseUrl: '/',
};
favicon
見出し「favicon」favicon の画像ファイルパスを指定します。今回は、画像ファイルのみ差し替えるので、コードはそのまま使用します。
module.exports = {
  favicon: '/img/favicon.ico',
};
trailingSlash
見出し「trailingSlash」リンクの URL の末尾に /(スラッシュ)を付けるかどうかを指定します。また、指定する値によって、出力されるファイルが異なります。
以下は指定できる値の一覧です。「出力ファイル」の項目は /docs/myDoc.md をビルドした時に出力されるファイルです。
| 値 | 内容 | 出力ファイル |
|---|---|---|
undefined | URL を変更しない(デフォルト値) | /docs/myDoc/index.html |
true | 末尾に /(スラッシュ)を付与 | /docs/myDoc/index.html |
false | 末尾の /(スラッシュ)を除去 | /docs/myDoc.html |
今回は、末尾にスラッシュを付与する true を指定します。
module.exports = {
  trailingSlash: true,
};
なお、Netlify や Vercel といったホスティングサービスによって URL の末尾のスラッシュの扱いが異なるため、ホスティングサービスやその設定に応じて、trailingSlash の調整が必要になることがあるので注意が必要です。
i18n
見出し「i18n」i18n は多言語対応で指定する項目ですが3、多言語対応が必要ない場合でも、HTML の lang 属性を指定するために使用します。
デフォルトは en なので、英語サイト以外の場合には必ず変更しましょう。
今回は、日本語サイトなので ja を指定します。
module.exports = {
  i18n: {
    defaultLocale: 'ja',
    locales: ['ja'],
  },
};変更すると、lang 属性の値に加えて、テキストラベルや WAI-ARIA 属性の値にも設定した言語のテキストが反映されます。

noIndex
見出し「noIndex」noIndex: true にすると、すべてのページに <meta name="robots" content="noindex, nofollow"> が追加されます。デフォルトは false です。
今回は、内部向けに限定公開するサイトを想定しているので、検索エンジンにインデックスされないように true を指定します。
module.exports = {
  noIndex: true,
};
tagline
見出し「tagline」サイトのタグラインを指定します。前回の変更が残っている場合には、そのままで構いません。
module.exports = {
  tagline: 'ウェブサイト運用担当者向けのガイドライン',
};
onBrokenLinks
見出し「onBrokenLinks」内部リンクのチェックにおけるログのレベルを設定できます。
チェックはビルド時(npm run build コマンドの実行時)にのみ実行されます。
今回は、設定を変更せずに throw のままとします。
module.exports = {
  onBrokenLinks: 'throw',
};
onBrokenMarkdownLinks
見出し「onBrokenMarkdownLinks」こちらは、Markdown や MDX ファイルに指定したリンクのチェックにおけるログのレベルを設定できます。
今回は、設定を変更せずに warn のままとします。
module.exports = {
  onBrokenMarkdownLinks: 'warn',
};
organizationName
見出し「organizationName」GitHub Pages にデプロイする際に使用する項目で、組織名(ユーザ名)を指定します。
今回は、ひとまずコメントアウトします。
module.exports = {
  // organizationName: 'facebook',
};
projectName
見出し「projectName」こちらも同様に、GitHub Pages にデプロイする際に使用する項目で、プロジェクト名(リポジトリ名)を指定します。
同じようにコメントアウトします。
module.exports = {
  // projectName: 'docusaurus',
};
themeConfig
見出し「themeConfig」themeConfig では、サイト全体のテーマを設定します。設定できる項目が多岐に渡るため、詳しい説明は割愛しますが、必要に応じて公式ドキュメントを参照してください。
今回は、デフォルトの設定をできるだけ維持した以下の内容とします。
const lightCodeTheme = require('prism-react-renderer/themes/github');
const darkCodeTheme = require('prism-react-renderer/themes/dracula');

module.exports = {
  themeConfig:
    ({
      docs: {
        sidebar: {
          hideable: true,
          autoCollapseCategories: true,
        },
      },
      colorMode: {
        defaultMode: 'light',
        disableSwitch: false,
        respectPrefersColorScheme: true,
      },
      navbar: {
        title: 'CMS 操作ガイド',
        logo: {
          alt: 'Pace Layering',
          src: 'img/logo.svg',
          srcDark: 'img/logo-dark.svg',
        },
        items: [
          {
            type: 'docSidebar',
            sidebarId: 'tutorialSidebar',
            label: 'Guides',
            position: 'left',
          },
          {
            to:'/blog',
            label: 'Blog',
            position: 'left'
          },
        ],
      },
      footer: {
        style: 'dark',
        links: [
          {
            title: 'CMS 操作ガイド',
            items: [
              {
                label: 'Guides',
                to: '/docs/intro',
              },
              {
                label: 'Blog',
                to: '/blog',
              },
            ],
          },
          {
            title: 'リンク集',
            items: [
              {
                label: 'CMS 管理画面',
                href: 'https://example.com/',
              },
              {
                label: 'Pace Layering 企業サイト',
                href: 'https://example.com/',
              },
            ],
          },
        ],
        copyright: `Copyright © ${new Date().getFullYear()} Pace Layering, Inc.`,
      },
      prism: {
        theme: lightCodeTheme,
        darkTheme: darkCodeTheme,
      },
    }),
};
以下、要点を説明します。
docs.sidebar
見出し「docs.sidebar」ドキュメントページでのサイドバーの挙動を設定しています。
hideable: true で、サイドバーの開閉を有効にし、autoCollapseCategories: true で、アコーディオンを開いたときに、ほかのアコーディオンを閉じるようにしました。
colorMode
見出し「colorMode」defaultMode: 'light' で、デフォルトはライトモードとしつつ、respectPrefersColorScheme: true で、初期状態は OS 側の設定を優先するようにしました。
navbar
見出し「navbar」グローバルヘッダのロゴ、タイトル、ナビゲーションを指定しています。
logo.srcDark は、ダークテーマ用の画像を別途指定しています。
footer
見出し「footer」グローバルフッタのスタイル、リンク一覧、コピーライトを指定しています。
prism
見出し「prism」Markdown / MDX で使用するコードブロックで使用するシンタックスハイライト(Prism)の設定です。こちらはデフォルトのまま変更なしです。
presets
見出し「presets」presets では、Docusaurus のテーマやプラグインの設定をします。
今回は、そのまま classic テーマを使用します。
GitHub の編集画面に遷移する「このページを編集」のリンク(editUrl)は使用しないため削除(もしくはコメントアウト)します。
module.exports = {
  presets: [
    [
      'classic',
      /** @type {import('@docusaurus/preset-classic').Options} */
      ({
        docs: {
          sidebarPath: require.resolve('./sidebars.js'),
          // editUrl:
          //   'https://github.com/facebook/docusaurus/tree/main/packages/create-docusaurus/templates/shared/',
        },
        blog: {
          showReadingTime: true,
          // editUrl:
          //   'https://github.com/facebook/docusaurus/tree/main/packages/create-docusaurus/templates/shared/',
        },
        theme: {
          customCss: require.resolve('./src/css/custom.css'),
        },
      }),
    ],
  ],
};
変更後の docusaurus.config.js
見出し「変更後の docusaurus.config.js」以上で、ひとまず docusaurus.config.js の設定は完了です。
変更後の全コードは以下のとおりです。
docusaurus.config.js の全コード(変更後)
// @ts-check

const lightCodeTheme = require('prism-react-renderer/themes/github');
const darkCodeTheme = require('prism-react-renderer/themes/dracula');

/** @type {import('@docusaurus/types').Config} */
const config = {
  title: 'CMS 操作ガイド',
  tagline: 'ウェブサイト運用担当者向けのガイドライン',
  favicon: 'img/favicon.ico',

  url: 'https://example.com',
  baseUrl: '/',
  trailingSlash: true,

  // GitHub pages deployment config.
  // organizationName: 'facebook',
  // projectName: 'docusaurus',

  onBrokenLinks: 'throw',
  onBrokenMarkdownLinks: 'warn',

  i18n: {
    defaultLocale: 'ja',
    locales: ['ja'],
  },

  presets: [
    [
      'classic',
      /** @type {import('@docusaurus/preset-classic').Options} */
      ({
        docs: {
          sidebarPath: require.resolve('./sidebars.js'),
        },
        blog: {
          showReadingTime: true,
        },
        theme: {
          customCss: require.resolve('./src/css/custom.css'),
        },
      }),
    ],
  ],

  themeConfig:
    /** @type {import('@docusaurus/preset-classic').ThemeConfig} */
    ({
      docs: {
        sidebar: {
          hideable: true,
          autoCollapseCategories: true,
        },
      },
      colorMode: {
        defaultMode: 'light',
        disableSwitch: false,
        respectPrefersColorScheme: true,
      },
      navbar: {
        title: 'CMS 操作ガイド',
        logo: {
          alt: 'Pace Layering',
          src: 'img/logo.svg',
          srcDark: 'img/logo-dark.svg',
        },
        items: [
          {
            type: 'docSidebar',
            sidebarId: 'tutorialSidebar',
            label: 'Guides',
            position: 'left',
          },
          {
            to:'/blog',
            label: 'Blog',
            position: 'left'
          },
        ],
      },
      footer: {
        style: 'dark',
        links: [
          {
            title: 'CMS 操作ガイド',
            items: [
              {
                label: 'Guides',
                to: '/docs/intro',
              },
              {
                label: 'Blog',
                to: '/blog',
              },
            ],
          },
          {
            title: 'リンク集',
            items: [
              {
                label: 'CMS 管理画面',
                href: 'https://example.com/',
              },
              {
                label: 'Pace Layering 企業サイト',
                href: 'https://example.com/',
              },
            ],
          },
        ],
        copyright: `Copyright © ${new Date().getFullYear()} Pace Layering, Inc.`,
      },
      prism: {
        theme: lightCodeTheme,
        darkTheme: darkCodeTheme,
      },
    }),
};

module.exports = config;
スタイルの調整
見出し「スタイルの調整」サイト全体のグローバルなスタイルを変更するには、presets の theme.customCss で指定した CSS ファイルを編集します。デフォルトは src/css/custom.css です。
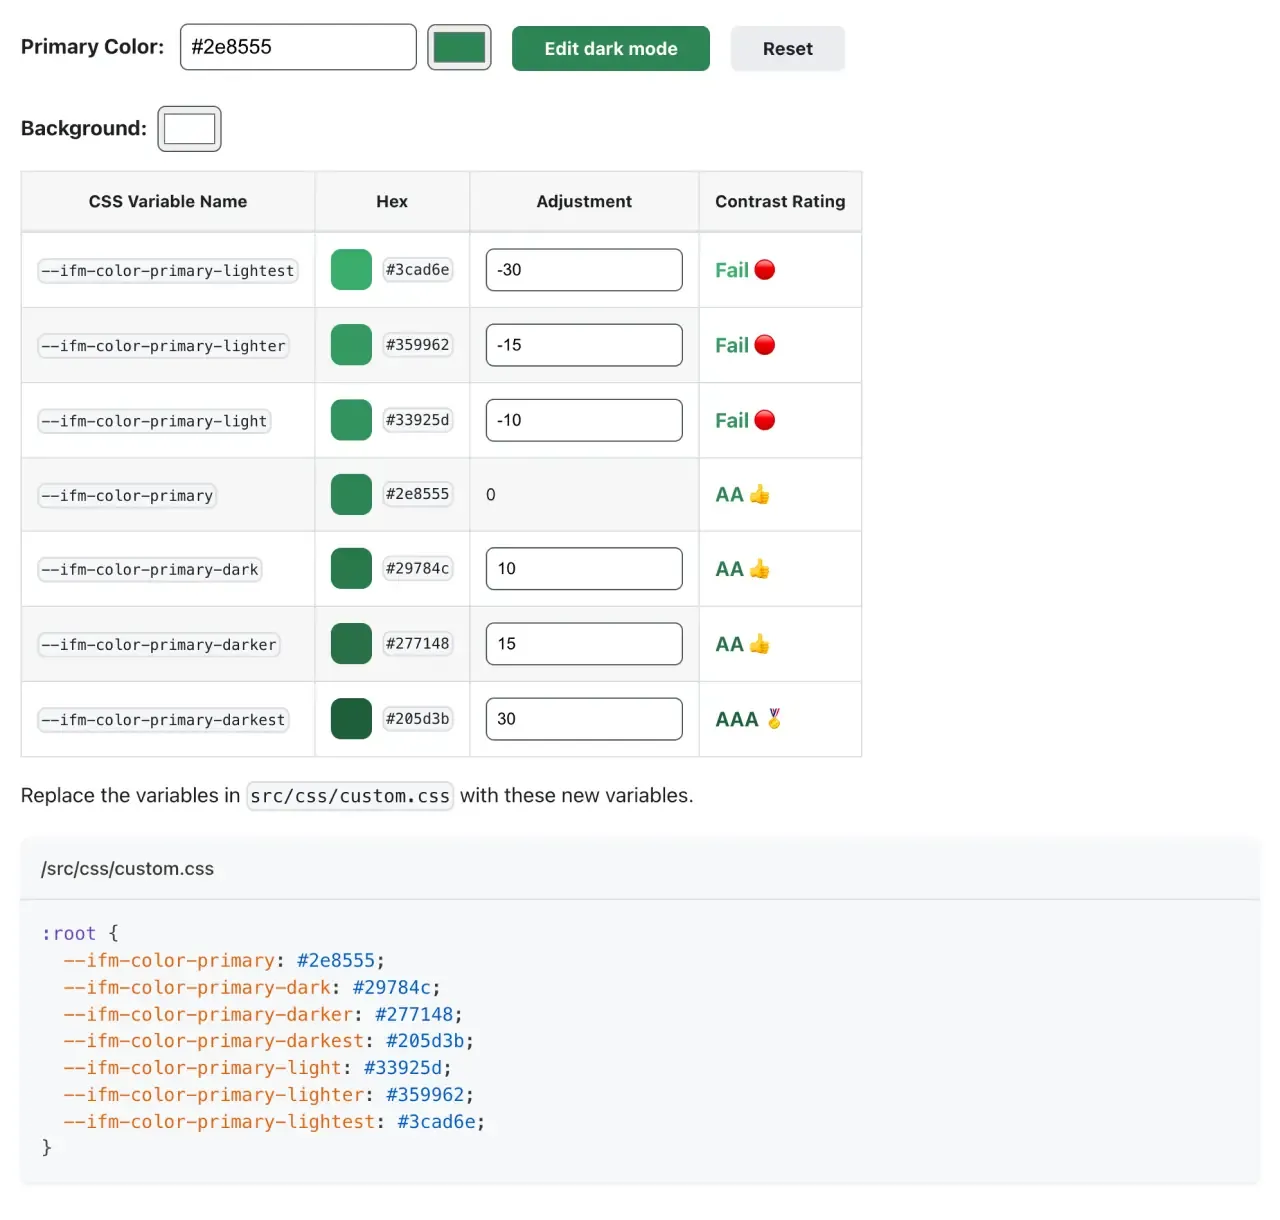
公式ドキュメントには、メインカラー(Primary Color)を選択すると、カラーパレットを生成してくれるツールが用意されています。

「Primary Color」と「Background」のカラーを選択すると、CSS カスタムプロパティ(変数)を生成してくれます。
表組み内の「Adjustment」で、明度のバランスを調整でき、「Contrast Rating」では WCAG のカラーコントラストを満たしているかを確認することができます。なるべく「Fail(不適合)」が発生しない配色を目指しましょう。
また、「Edit dark mode」ボタンを選択すると、ダークモードのカラーパレットが作成できます。
今回の作例では、ロゴマークの色相から、「Primary Color」をライトモードでは #2f4892、ダークモードでは #a6b3d9 とします。
「Background」はダークモードのみ #181a20 に微調整します。
生成された CSS のコードにカスタマイズを加えたコードは以下のとおりです。
/**
 * Any CSS included here will be global. The classic template
 * bundles Infima by default. Infima is a CSS framework designed to
 * work well for content-centric websites.
 */

/* You can override the default Infima variables here. */
:root {
  --ifm-color-primary: #2f4892;
  --ifm-color-primary-dark: #2a4183;
  --ifm-color-primary-darker: #283d7c;
  --ifm-color-primary-darkest: #213266;
  --ifm-color-primary-light: #344fa1;
  --ifm-color-primary-lighter: #3653a8;
  --ifm-color-primary-lightest: #3d5ebe;
  --ifm-footer-link-hover-color: revert;
  --ifm-code-font-size: 95%;
  --docusaurus-highlighted-code-line-bg: rgba(0, 0, 0, 0.1);
}

/* For readability concerns, you should choose a lighter palette in dark mode. */
[data-theme='dark'] {
  --ifm-color-primary: #a6b3d9;
  --ifm-color-primary-dark: #8b9cce;
  --ifm-color-primary-darker: #7e91c8;
  --ifm-color-primary-darkest: #6b81c0;
  --ifm-color-primary-light: #c1cae4;
  --ifm-color-primary-lighter: #ced5ea;
  --ifm-color-primary-lightest: #f7f8fb;
  --ifm-background-color: #181a20;
  --docusaurus-highlighted-code-line-bg: rgba(0, 0, 0, 0.3);
}
生成されたコード以外で、個別にカスタマイズしたのは --ifm-footer-link-hover-color: revert の部分です。
デフォルトの CSS では、フッタのテキストリンクにホバーした時のカラーコントラスト比が十分に確保されないため、revert を指定してカラーが変化しないようにしています。
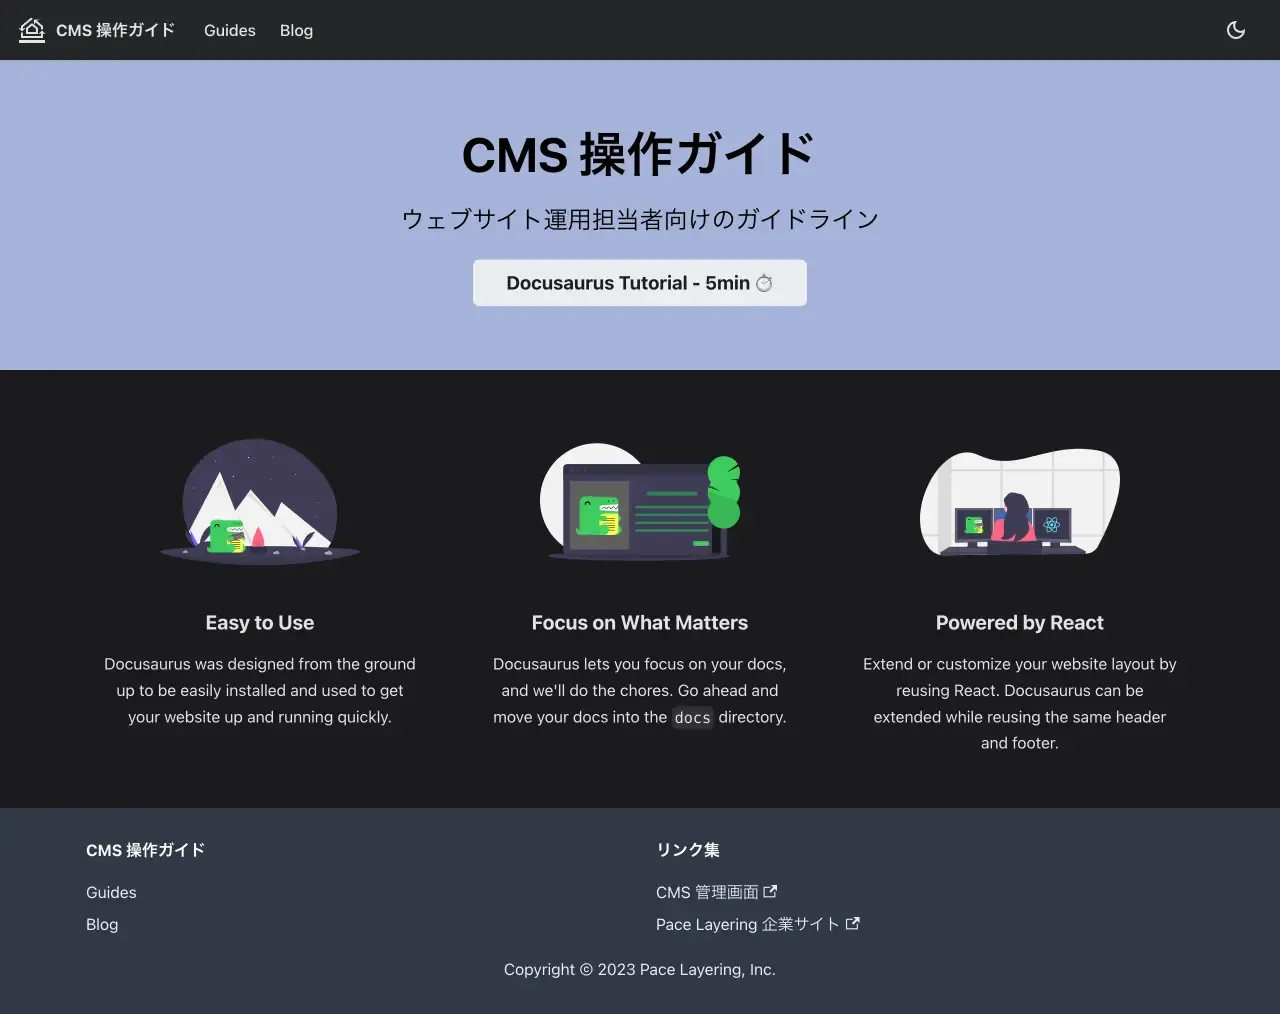
以上で基本設定は完了です。変更後の見た目は以下のようになります。


次回は、ドキュメントページを作成していきます。
脚注
-
i18n は internationalization のヌメロニム(numeronym、数略語)です。ヌメロニムは長い英単語を数字で省略するときに用いられる表現で、ほかには a11y(accessibility)などがあります。 ↩